Motor | Sound | Display | Communication | My Stuff | Control | Sensor | Timing | Data | Math
![]() |
Motor |
![]() |
The motor select block lets you control which motors the RCX
will send all the following commands will to. Basically it tells the
selected motors "hey, listen up!".
|
![]() |
The motor control block lets you turn motors on and off.
|
![]() |
The onfor block will turn on any motors that are "listening" for the specified amount of time. The time is in tenths of seconds, so onfor 10 turns on the motors for one second. If you want to turn on a motor for 10 seconds, use onfor 100 |
![]() |
The reverse block tells any motors that are "listening" to reverse their direction: instead of clockwise they'll turn counterclockwise, or vice versa. |
![]() |
The motor direction block sets the direction the motors are turning. A motor can either turn thisway or thatway. You can click on this block to change the direction. |
![]() |
The setpower block tells any motors that are "listening" to change their speed. Power levels range from 0 (off) to 8 (full power, the fastest). |
![]() |
Sound |
![]() |
The beep block makes the RCX beep! This is incredibly for debugging their your code. If you put this block in your program, you can hear when the program gets to that point. |
![]() |
The note block plays a note of your choosing. The top number determines the pitch of the note: the higher the number, the lower the note. The RCX waits until the note is done playing before moving onto the next command in your program. Remember that on an RCX, only notes between 60 and 96 play anything! The bottom input determines the length of time the note is play (in this case one second, since values are in tenths of a second). |
![]() |
Display |
![]() |
The print block lets you display a number on the small LCD display on the RCX brick. |
![]() |
Communication |
![]() |
The newir? block lets you find out when your RCX has received a new infrared transmission from another RCX. It reports a true when a new infrared signal has received, and a false otherwise. |
![]() |
The ir block lets you find out what another RCX sent to your RCX via infrared. This number will be between 0 and 255. |
![]() |
The send block lets you send a number to another RCX over infrared. This number can only be between 0 and 255. |
![]() |
My Stuff |
![]() |
This is the special "run-button" procedure. You can double-click this block and your program will immediately downloaded to the Brick and start running. After you download your code, whatever is attached to the run-button block will run when you press the run button on your actual Brick. |
![]() |
You can create your own collections of commands, called a procedure, using the empty purple hat. Once you drag out a purple hat, you can click once and then type in a name for it. You can call your new procedure using the call block (see description below). |
![]() |
The call block lets you call a procedure. Clicking on this block allows you to cycle through all of the named procedures, letting you pick the one you want to call. Whenever you give a name to a purple hat, the name of the new procedure is automatically added to the list of call blocks. |
![]() |
The setthis block lets you set the value of one of the LogoBlocks global variables - this and that. Once you have used the setthis or setthat blocks to set the this or that to a value, you can use the this block and the that blocks to recall that value. Clicking on this block cycles to let set the that variable. |
![]() |
The this block reports the value of one of the LogoBlocks global variables - this and that. Once you have used the setthis or setthat blocks to set the this or that to a value, you can use the this block and the that blocks to recall that value. Clicking on this block cycles to let you read back the that variable. |
![]() |
The info block allows you to add comments to your program. Click on it once and then start typing. If you want to write a longer note, use more than one info block. |
![]() |
Control |
![]() |
The stop block tells the RCX to stop running whatever program it is running. |
![]() |
The if block tells the RCX to only run the attached blocks if the specified condition is met. The if block firsts tests the condition attached to the upper right. Then, if the condition is true, the RCX runs the blocks attached to the lower right. If the condition is false, the RCX goes on to the next command in your program. Remember that the if block only checks the condition once! You should use it inside of a loop block if you want to check something over and over again. |
![]() |
The ifelse block tells the RCX to only run one set of attached blocks if the specified condition is true, and another set if it is false. The ifelse block firsts tests the condition attached to the upper right. Then, if the condition is true, the RCX runs the blocks attached to the first slot on the lower right. If the condition is false, the RCX runs the blocks attached to the second slot on the lower right. Remember that the ifelse block only checks the condition once! You should use it inside of a loop block if you want to check something over and over again. |
![]() |
The loop block repeats a set of commands forever. The commands attached to the right are repeated over and over again. This command is useful in combination with an if or ifelse block, allowing you to continually check a sensor. |
![]() |
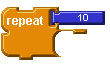
The repeat block repeats a set of commands a specified number of times. The number block attached at the upper right tells the RCX how many times to repeat the commands. The commands attached to the hook on the lower right are the command that get repeated. |
![]() |
The waituntil block tells the RCX to wait until some condition is met. In this case, the RCX would wait until a switch plugged into sensor port A is pressed. Once the condition is satisfied, the RCX continues on to the next block in your program. |
![]() |
Use the wait block to have the RCX wait for a specified length of time. The number attached to the right tells the RCX how long to wait. This is a length of time in tenths of seconds. Thus to wait for one minute, you would enter the number 600. |
![]() |
The powerdown block can be used to turn the RCX off. |
![]() |
The when block sets up the RCX to stop your program and run the blocks attached when a certain condition is true. In this case, whenever a switch plugged into sensor A is pressed, the RCX would stop whatever program is currently running, and start running the blocks attached to its lower right slot. When those blocks are done, the RCX will return to wherever it was before it was interrupted. You can only have one when interruption running at a time. If you setup another one, it will replace the previous one. |
![]() |
The every block launches a parallel process that interrupts the RCX every specified amount of time, and runs the blocks attached. The interval is attached to the upper right and is specified in tenths of seconds. The blocks to run after that amount of time are attached to the hook on the lower right |
![]() |
The launch block starts a program running the blocks attached in parallel to the main program the RCX is running. The main program continues to run, as does the program made up of the blocks attached to the right of the launch block. You can have a maximum of 7 parallel processes running at one time. |
![]() |
The blank block doesn't do anything! It often turns out that blocks end up overlapping. You can put blank blocks between other blocks to space them out to make your program easier to read on the screen. |
![]() |
Sensor |
![]() |
The switcha block lets you find out if a switch plugged into your RCX is pressed or not. If a switch is pressed, this block will report a true value. If it is not, it will report a false value. You can cycle between checking a switch plugged into other sensor ports by clicking on this block once. |
![]() |
The sensor block lets you find out the value of a sensor plugged into your RCX. This will report a number between 0 and 255. You can cycle to sensors or switches plugged into other sensor ports by clicking on this block. |
![]() |
The newir? block lets you find out when your RCX has received a new infrared transmission from another RCX. It reports a true when a new infrared signal has received, and a false otherwise. |
![]() |
The ir block lets you find out what another RCX sent to your RCX via infrared. This number will be between 0 and 255. |
![]() |
The send block lets you send a number to another RCX over infrared. This number can only be between 0 and 255. |
![]() |
The counter block reports the value of a shaft encoder plugged into a sensor port. Click on this block to cycle between reading an encoder plugged into sensor1 (as counter1), sensor2 (as counter2), or sensor3 (as counter3). |
![]() |
The reset-counter block resets the value of a shaft encoder plugged into a sensor port. Click on this block to cycle between resetting an encoder plugged into sensor1 (as reset-c1), sensor2 (as reset-c2), or sensor3 (as reset-c3). |
![]() |
The vbat block reports a value proportional to the amount of charge left in the batteries of the RCX. |
![]() |
Timing |
![]() |
Use the wait block to have the RCX wait for a specified length of time. The number attached to the right tells the RCX how long to wait. This is a length of time in tenths of seconds. Thus to wait for one minute, you would enter the number 600. |
![]() |
The timer block reports the elapsed time since the timer was last reset (by using the resett block). Note that the timer counts in milliseconds (1000 equals one second). Thus the timer can only count up to 32 seconds or so, after which is will reset itself to zero (this is called "rolling over"). |
![]() |
The resett block tells the RCX to reset the timer to 0. |
![]() |
The counter block reports the value of a shaft encoder plugged into a sensor port. Click on this block to cycle between reading an encoder plugged into sensor1 (as counter1), sensor2 (as counter2), or sensor3 (as counter3). |
![]() |
The reset-counter block resets the value of a shaft encoder plugged into a sensor port. Click on this block to cycle between resetting an encoder plugged into sensor1 (as reset-c1), sensor2 (as reset-c2), or sensor3 (as reset-c3). |
![]() |
The every block launches a parallel process that interrupts the RCX every specified amount of time, and runs the blocks attached. The interval is attached to the upper right and is specified in tenths of seconds. The blocks to run after that amount of time are attached to the hook on the lower right |
![]() |
Data |
![]() |
The erase block erases the data in the RCX's data memory at the location pointed to by the data pointer. You might want to use this right at the start of a program that collects data, just to make sure that the RCX's data memory is full of zero. |
![]() |
The record block saves the number attached to next position in data memory. After saving, it increments the data pointer to point to the next spot in data memory. |
![]() |
The recall block recalls the value recorded at the location in data memory currently pointed at by the data pointer. |
![]() |
The setdp block sets the data pointer to the number specified. |
![]() |
The resetdp block lets you setup the RCX to record data. After resetting the data pointer, you can use the record block to save a sensor value or other number into data memory. |
![]() |
Math |
|
You can use the number block to specify numbers to use in RCX
math! These numbers can be between 0 and around 32,767. But remember that
most RCX numbers are between 0 and 255 (like the sensors). You can edit
this number by clicking on it once, after which a red outline appears
around it. Then whatever number you type in appears on the block. It
usually drags out with a 10, like this: |
![]() |
The random block reports random numbers. These numbers will be between 0 and 32,767. |
![]() |
The comparison block lets you compare two numbers. Clicking on it lets you cycle between the following types of different comparisons:
|
![]() |
The operation block lets you do common mathematical operations on numbers. Clicking on it lets you cycle between the following types of operations:
|
![]() |
The boolean block lets you combine conditional statements. Clicking on it lets you cycle between the following types of operations:
|
![]() |
The not block changes what a condition reports. If the condition to the right returns true, the not block will change it to a false. Similarly, if the condition to the right returns false, the not block will change it to a true. |