PIC Chip Communication with a PC
Simple Serial - Controlling PIC Chips With Java (On Windows)
Download
SimpleSerial Here
January 7, 2001 -- New Release: SimpleSerial was
incorrectly reading negative values from the serial port. This bug has
been fixed in the current version. This new version also adds the ability
to switch between using included Windows DLL and the JavaComm package from sun. If
you have troubles with my code and suspect it's buggy, you can now switch to
Sun's package without rewriting
any code.
January 20, 2001 -- New Release Better error messages. Now
if something goes wrong, SimpleSerial will actually tell you about it.
The previous version of SimpleSerial can be found here.

Controlling PIC chips with Java is easy and fun. It's simply a matter of reading and writing the serial port. The JavaComm package from Sun accomplishes this, but it's tricky to install and use. For heavy-duty serial port applications that require
more than simple IO, that's the package for you. For most PIC chip applications, the "Simple Serial" package described here is what you want.
SimpleSerial is especially useful if you're going to be running on several
different machines and don't have time to set up the environment on each one. As long as you have SimpleSerialNative.dll in the same
folder as your java code, (and the machine runs java), you're all set.
Because SimpleSerialNative.dll is small (28k), everything can fit on a single floppy
disk. SimpleSerial lets to communicate with the serial port using a
handful of lines of code.
SimpleSerial was designed for Windows machines, but will work on any machine
that supports Sun's JavaComm package. Therefore, the code you write is
still portable across platforms.
SimpleSerial was developed in Java 1.2 on Windows2000 using Symantec Visual Café
4.0.
If you're interested in SimpleSerial, please email benres@media.mit.edu
with comments and suggestions. I will let you know of any bug fixes or
improvements.
- Download "SimpleSerial.zip", and
unzip somewhere useful.
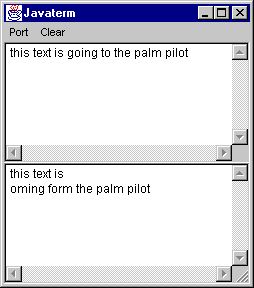
- Double click on JavaTerm.bat. It runs a serial port terminal emulation
program similar to HyperTerm.
- To build in Windows, double-click on SimpleSerial.vep to launch VisualCafe. If you're not using
VisualCafe, you can build and run from the command line.
To build: javac JavaTerm.java
To run: java JavaTerm
- Run the included "JavaTerm" terminal emulation program.
Including SimpleSerial in your own project
- Include the following three files in your project:
- SimpleSerial.java
- SimpleSerialNative.java
- SimpleSerialJava.java
- Make sure SimpleSerialNative.dll is in the same folder as your .java
files. Alternatively, you can put it in your Windows/System folder.
If you don't do this, you'll get an "unsatisfied link error" when
you run SimpleSerial.
- If "SimpleSerialJava.java" doesn't compile, remove it. It
means you don't have JavaComm installed. You only need "SimpleSerialJava.java"
if you want to use Sun's JavaComm as the glue between SimpleSerial and the
actual serialport.
- The code you write will look something like this:
public static void main(String
args[]) {
SimpleSerial ss; // declare the SimpleSerial object
ss = new SimpleSerialNative(2); // new up the SimpleSerial object
ss.writeByte((byte)'a'); // write a byte to the serial port
// Give the PIC chip time to digest the byte to make sure it's ready for the next byte.
try { Thread.sleep(1); } catch (InterruptedException e) {}
ss.writeByte((byte)'!'); // write another byte to the serial port
String inputString = ss.readString(); // read any string from the serial port.
System.out.println("I read the string: " + inputString);
} |
For more information about individual calls, see the
comments in SimpleSerial.java.
NOTES:
- DO NOT add SimpleSerial.java to a package. It will compile, but it will not run because
SimpleSerialNative.dll does not know about the package. To place SimpleSerial.java into a package, you need to use Javah to create a new .H file, update the method names in SimpleSerial.cpp, and rebuild the DLL. See The Java Native Interface by Shen Liang ( © 1999, Sun Microsystems) for more info on the Java Native Interface.
- Windows computers may mistake streaming serial port data from a PIC as a
serial mouse. This is generally not what you want. If you
restart your computer and the mouse starts going crazy, it's probably
because your serial device is being mistaken for a really twitchy mouse
user.
Controlling PIC Chips With your Palm Pilot
Palm Pilots contains a serial port just like that on your PIC chip or PC. Palm Pilots can communicate with PIC chips through a terminal emulation program, just like "Hyperterm" on the PC. Using the Palm Pilot to control your PIC, though, is significantly easier and more portable.
- Download and install the terminal software on your Palm Pilot. I'm using a shareware program called Online, which is available at: http://www.markspace.com/online.html.
If you have trouble with this link, search on http://www.download.com.
You can also download my cached copy here.
- In the "Communications" menu for Online, configure for 9600 Baud, 8 data bits, 1 stop bit, and "CR+LF" for Return. Leave "XON/XOFF" and "RTS/CTS" unchecked. On the main screen, check the box in the lower left corner that says "O" (online), and you're ready to go.
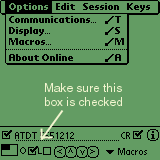
- To test communications, place your pilot in its cradle. Exit your hotsynch manager to free up the pilot serial port.

- Launch SimpleSerialEXE (or some other terminal program such as Hyperterm). Select the proper serial port from the menu. Type a few characters on the keyboard, and watch them appear on the pilot. Similarly, type some characters on the pilot, and see them appear on the screen. Communication is working.
- To connect the PIC chip to your pilot, you'll need a female-female gender changer, a null modem, and the Palm Pilot cable. The null modem swaps lines 2 and 3 of the serial port so the TX is connected to the RX, and vica-versa. Make sure you're using a null modem and not a gender changer or extension. The look similar. Null Modems typically say "Null Modem" on them. Gender changers and null modems are available from Radio Shack.
Connect as shown:
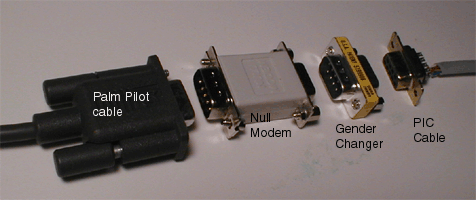
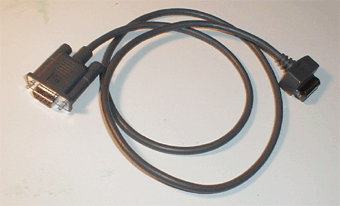
NOTE: To avoid lugging around your HotSynch cradle, Pilot sells portable serial cables that plug directly into your pilot.

Future Cool Stuff
IR PalmPilot - PIC communication: All new PalmPilots have an IR port. All PIC chips have an IR port.
Non-hyperterm PIC control from a PalmPilot: Some type of interaction builder for the PalmPilot. There are versions of Visual Basic which could probably be adapted to communicate with the serial port and control a PIC.


![]()


![]()